Searching for creative ways to DIY your low-waste Christmas decor this year?
From natural ornaments to simple, plastic-free pieces made with leftover fabric, these ideas are fun to make. And they’re beautiful enough to bring out year after year.
P.S. If you love a good hands-on project, check out my guide to DIY holiday gifts next.
🎄 And you can find all of our holiday/Christmas guides right here!
Here's what this article includes:
- Here’s My List of DIY & Low-Plastic Christmas Decoration Ideas
- 1. DIY Ornaments from Recycled Materials
- 2. Zero-Waste Nature-Inspired Wreaths
- 3. Upcycled Centerpieces Using Repurposed Jars
- 4. Compostable Popcorn Garland
- 5. DIY Cloth Napkins
- 6. DIY Paper Snowflakes
- 7. Recycled Card Ornaments
- 8. Zero-Waste Cloth Gift Wrapping
- 9. Pinecone Place Card Holders
- 10. Upcycled Sweater Pillow Covers
- 11. Fabric Scrap Tree Skirt
- Holiday Decorations Are Super Wasteful
- More Ideas for a More Natural, Low-Plastic Christmas
- 🍋 Join Thousands of Subscribers Reducing Toxic Chemicals
Here’s My List of DIY & Low-Plastic Christmas Decoration Ideas
The holiday season tends to be super wasteful (more on that below), but it doesn’t have to be! Here are a bunch of relatively easy ideas to reduce plastic and waste in general this season:
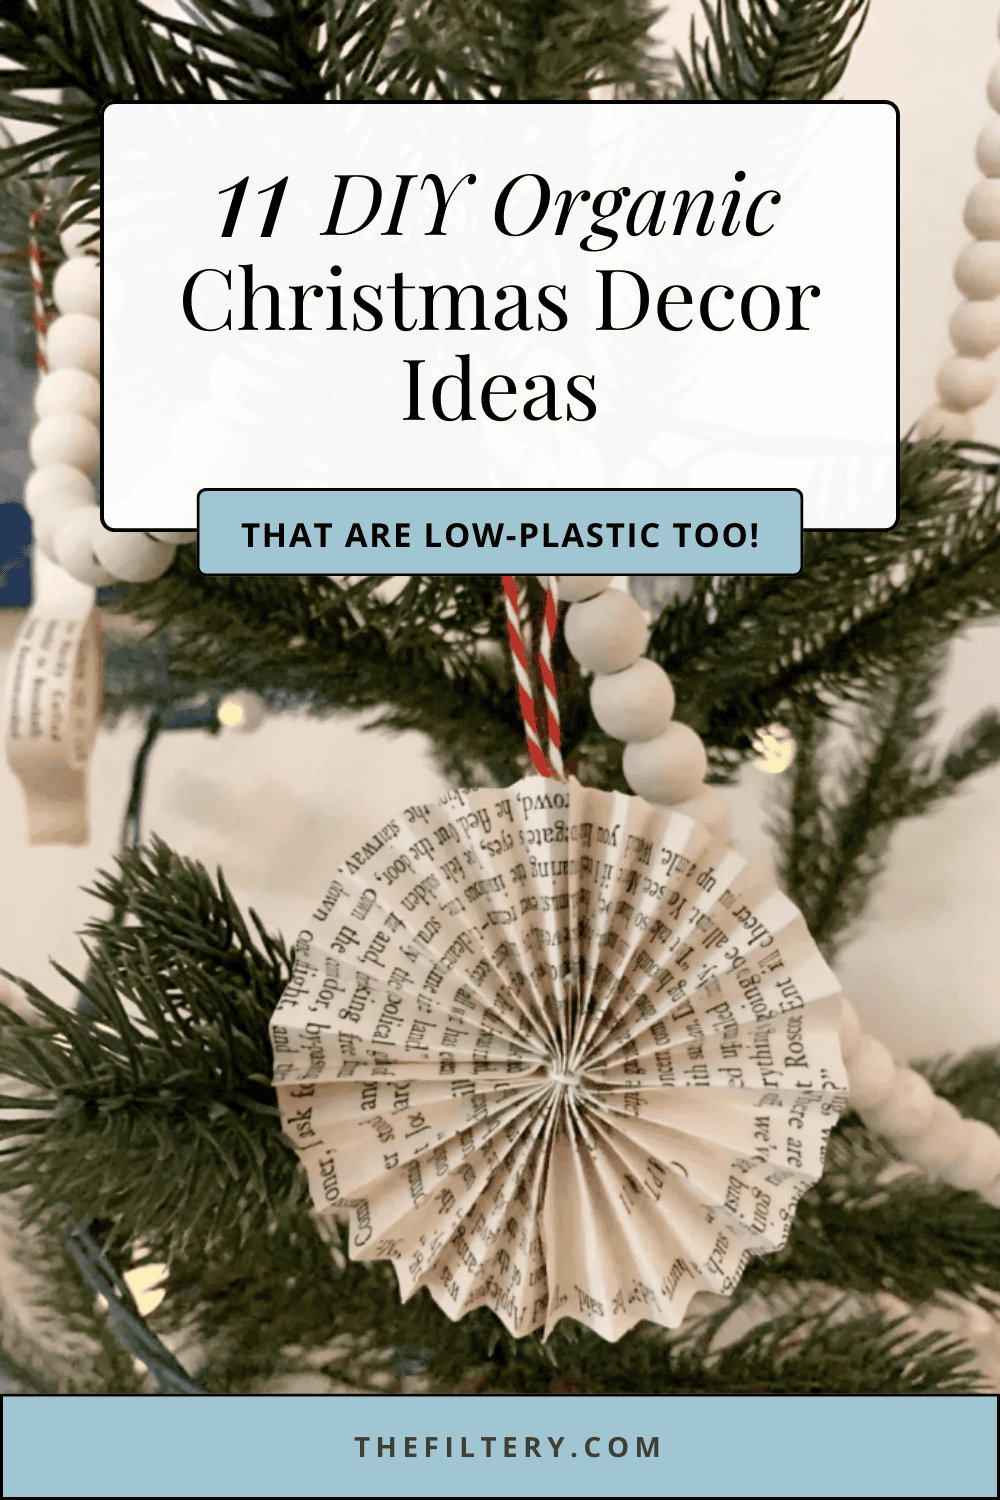
1. DIY Ornaments from Recycled Materials


Gather up those old magazines, newspapers, scrap fabric, or even old books.
Crafting ornaments from recycled materials not only reduces waste but also allows you to add a personal touch to your tree.
You can make them as simple or as fancy as you want. Simply cut your paper or fabric into various shapes and sizes, add a ribbon or string, and voila—you’ve got unique, upcycled ornaments that are kind to the environment and your wallet.
Here are some tutorials you may find helpful:
- 4 ways to make origami ornaments out of old books
- 6 Christmas ornaments made from sheet music
- DIY letter ornaments using fabric scraps
- Scrap fabric twine ornaments
2. Zero-Waste Nature-Inspired Wreaths


Utilizing nature’s gifts for wreath-making is a sustainable choice that makes your Christmas decor even more beautiful! It celebrates the beauty of the outdoors, brings a touch of the natural world into your home, and reduces the need for synthetic materials often used in traditional wreaths.
Simply take a stroll in your backyard or a nearby park to collect pine branches, a pine cone or two, and whatever other natural elements you might be inspired by. With a little creativity and some twine, you can craft a stunning wreath that’s beautiful and biodegradable.
Materials Needed:
- Twigs
- Pine cones
- Leaves
- Berries
- Twine
- A circular base (wire or cardboard)
- Scissors
- Hot glue
Steps:
- Choose your base. You can either cut a circle out of a large cardboard box or fashion a wire clothes hanger into a circle.
- Arrange the twigs in a circular pattern and secure them to the base using hot glue and/or twine.
- Attach pine cones, leaves, and berries using hot glue, creating a festive arrangement.
- Hang your nature-inspired wreath on the door or wall for a charming holiday touch.
(Note: The hot glue is not biodegradable, so you will have to disassemble it if you want to throw this wreath in the compost when you’re finished with it.)
Here’s a tutorial from A Pretty Fix:

3. Upcycled Centerpieces Using Repurposed Jars

This one is super easy.
Creating centerpieces from upcycled jars is a clever way to repurpose old containers and showcase nature’s beauty while minimizing the need for new, non-biodegradable materials.
Materials Needed:
- Old jars (either mason jars or cleaned food jars, like peanut butter, salsa, etc.)
- Paint (optional)
- Foraged materials of your choice (pine cones, dried flowers, dried fruit, etc.)
- Whatever else you want to put in your jars (like holiday candies, cranberries, rosemary, small sphere ornaments, or Epsom salt for “snow”)
- Ribbon or twine
Steps:
- Paint a portion of the jar if you choose to.
- Fill the jars with whatever you want.
- Put the lids on and tie some twine or ribbon around the top.
- Arrange the jars in the center of your table for a beautiful and eco-friendly centerpiece.
4. Compostable Popcorn Garland

Your classic popcorn garland is another great choice for natural Christmas decor that can be composted after the holiday season.
Materials Needed:
- Fresh, popcorn (unbuttered and unsalted)
- Fresh Cranberries (optional)
- Dried orange slices (optional)
- String
- Large needle
- Scissors
Steps:
- Pop enough popcorn to make the desired length of your garland.
- Wash the cranberries (if using) and allow them to dry.
- If you want to use dried orange slices, you can make your own by slicing oranges thinly and baking them at 200°F (93°C) for about 2-3 hours or until they are completely dry. (You’ll want to make sure all of your supplies are dried properly in order to prevent mold!)
- Clear a large, flat surface like a table or countertop.
- Lay out your popcorn, cranberries, and dried orange slices in separate bowls.
- Cut a length of thread as long as you want your garland to be, plus a little extra for tying off.
- Thread the needle and begin stringing by piercing through a piece of popcorn, then a cranberry, then an orange slice, and repeat, creating a pattern as you prefer.
- Continue stringing until you reach the desired length of your garland.
- Once you have reached the desired length, tie off the ends of the thread securely to avoid any pieces falling off.
- Drape the garland across your Christmas tree, mantle, or any other area you’d like to decorate.
- Adjust the spacing of the popcorn, cranberries, and orange slices as needed for a balanced and beautiful look.
- Be sure the garland is in a cool, dry place to prevent it from attracting pests or molding.
(Note: Using thread made of a natural material like cotton will allow you to throw your whole garland in your home compost when you’re finished with it. But if you use something synthetic like dental floss or fishing line, you can just cut the end of the garland, slide the food off the end, compost that, and then throw the string in the trash.)
5. DIY Cloth Napkins

Crafting reusable cloth napkins for your holiday dinner encourages sustainability by reducing the use of disposable paper napkins. (Plus, they can of course be washed and used for many future celebrations, too!)
Materials Needed:
- Scrap fabric or old pillowcases
- Sewing machine (or a needle and thread for hand-sewing)
- Or you could even buy your own new holiday-themed organic cotton patterned fabric
Steps:
- Cut the fabric into square or rectangular shapes. I suggest 18×18 inches, but you can make them whatever size you want. You can even cut out different sizes for adults’ and kids’ napkins.
- Fold down the edges about 1/2 inch and use an iron to hold the crease in place. (See the video above for an example.)
- Hem the edges by folding them over and sewing to prevent fraying.
Simple as that!
6. DIY Paper Snowflakes

This is a super cheap and easy one that I’m sure you’ve done at some point in your life. What kid hasn’t cut out out snowflakes at school at some point!?
Just cut out intricate snowflake patterns from old magazines or unwanted paper. Hang them by the window for a beautiful and eco-friendly snowy scene.
Materials Needed:
- Any kind of paper (old magazines, computer paper, etc.)
- Scissors
- Hole punch
- Ribbon or string
Steps:
- Cut out pages from old magazines and fold them into small squares.
- Cut various patterns into the folded squares to create unique snowflake shapes. (See the video below for a tutorial in action.)
- Add a hole at the top and thread a ribbon or string for hanging.

7. Recycled Card Ornaments
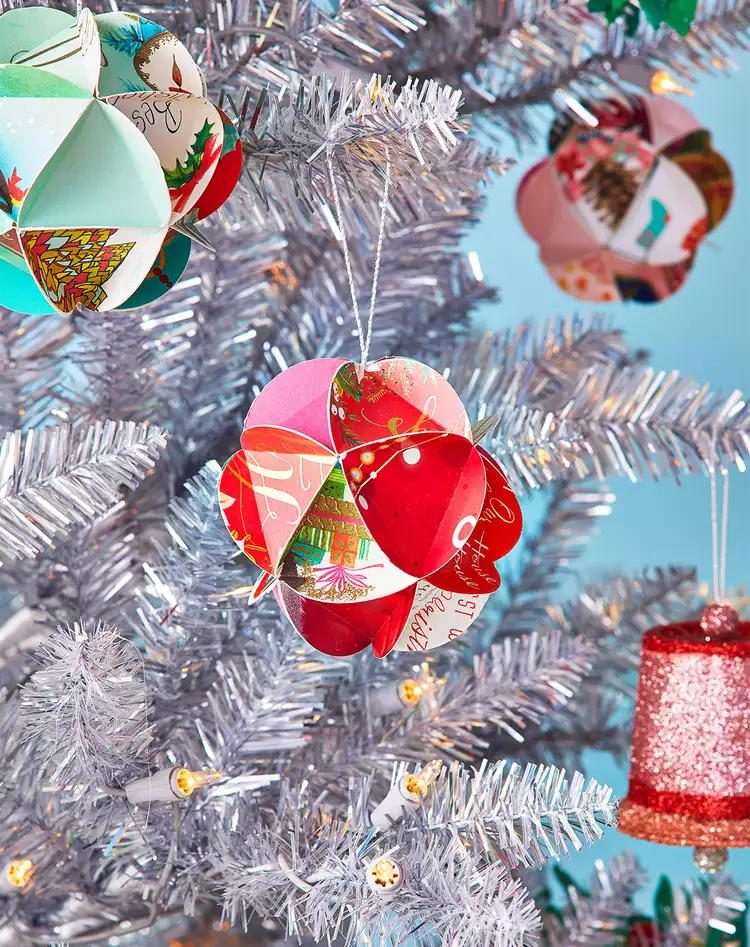
Here’s another idea: make your own ornaments out of recycled holiday cards from last year! It allows you to cherish memories while reducing paper waste, making each ornament a unique reminder of the holidays past. Plus, it’s extremely easy.
Materials Needed:
- Old holiday cards
- Hole punch
- Ribbon or string
- Scissors
Steps:
- Cut out festive shapes (stars, trees, bells) from the old holiday cards.
- Add a hole at the top of each shape using a hole punch.
- Thread a ribbon or string through the hole and tie a knot at the end for hanging.
*If you didn’t keep last year’s cards, then just hang onto your cards this year and keep this idea in mind for next year’s eco-friendly Christmas decorations!
8. Zero-Waste Cloth Gift Wrapping


Instead of traditional, single-use wrapping paper that often ends up in the bin, consider using cloth or scarves to wrap your gifts. The cloth can be reused for many future gift-giving occasions (or fashion accessories!), minimizing the demand for single-use wrapping paper and reducing waste. It’s reusable and adds an extra layer of thoughtfulness to your presents.
It’s pretty straightforward, but here’s how to do it:
Materials Needed:
- Cloth or scarves
- Reusable ribbon or twine
Steps:
- Simply place your gift in the center of the cloth.
- Gather the cloth around the gift and tie it securely with a reusable ribbon or twine. (You basically wrap it the same way you would with regular wrapping paper, but you just use a knot or ribbon instead of tape to hold it together. See the video below for a Furoshiki tutorial.)
- Add a small decorative ornament or a sprig of greenery for an extra festive touch.

9. Pinecone Place Card Holders

Pinecone place card holders are a charming and rustic addition to your holiday table. These Pinterest-worthy decorations are eco-friendly, easy to make, and add a personal touch to your dining decor while utilizing natural elements. It’s an especially good idea if you’re planning on hosting your own family dinner!
Materials Needed:
- Pine cones
- Small cards or paper
- Scissors
- Glue (optional)
- Paint (optional)
Steps:
- Collect pine cones from your yard or a park, ensuring they are relatively clean and dry.
- If you want to add an extra layer of decoration, you can paint the tips of the pine cones with a color of your choice (as shown in the tutorial above).
- Cut small cards or paper into rectangles.
- Either glue the cards onto the pine cones or you can simply fold them in half to create mini place cards that will stand up on their own when you wedge them in between the little spikes.
10. Upcycled Sweater Pillow Covers


Do you have old Christmas sweaters, sweatshirts, or tablecloths lying around collecting dust? It’s time to give them a brand-new life. Transforming old sweaters into pillow covers can add a warm texture to your decor, and of course, reduce textile waste.
You can, of course, use holiday-specific fabrics (or an ugly Christmas sweater maybe?), but even anything green, red, or white will help give your home some more holiday vibes.
Materials Needed:
- Old sweaters or other fabrics
- Pillow inserts or stuffing material (if you need to buy natural/organic filling, see our bean bag guide for options)
- Fabric scissors
- Sewing machine (or needle and thread for sewing by hand)
Steps:
- Cut the sweater into square or rectangular shapes to fit your pillow inserts.
- Sew the edges to create pillow covers, leaving one side open for inserting the pillow or stuffing.
See this helpful tutorial for more details:

11. Fabric Scrap Tree Skirt
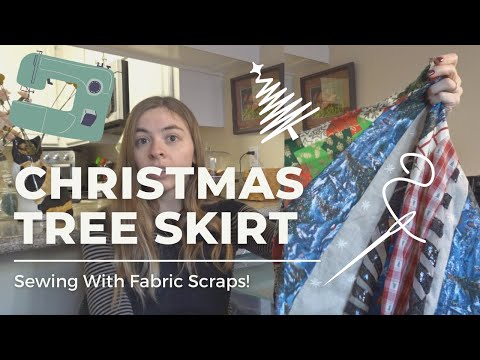
Here’s another idea for holiday decor using any old fabric you have lying around: make a tree skirt! It adds a personalized touch to your holiday decor and beautifully complements your tree.
Materials Needed:
- Fabric scraps
- Fabric scissors
- Sewing machine (or needle and thread if sewing by hand)
Steps:
- Cut fabric scraps into strips and sew them together to create a long, continuous strip.
- Coil the strip into a spiral shape to form the tree skirt, sewing it in place as you go.
Holiday Decorations Are Super Wasteful
Most of us know based on our own personal experience with the holiday season just how wasteful it can be.
It’s estimated that about 500 tonnes of Christmas twinkle lights are thrown away each year! It’s also said that the UK alone generates the weight of 3.3 million emperor penguins in plastic waste each Christmas. 😳
By going plastic-free (or at least low-plastic) and taking the DIY route for your holiday decorations this year, you can do your small part to decrease microplastic pollution.
More Ideas for a More Natural, Low-Plastic Christmas
Here are some more ideas for a zero-waste holiday. (These ideas might save you some money as well!)
You don’t have to go 100% zero-waste/zero-plastic of course. Even just minimizing the amount of new plastic products you buy this year can make a difference. As always, we’re going for progress over perfection!
- Consider gifting experiences over material gifts. Some ideas: a special meal, organizing a game night, or even just going on a nature hike with loved ones. You don’t have to do anything super fancy to create lasting memories.
- Opt for digital invitations/cards or recycled paper to reduce paper waste.
- If using a Christmas tree, consider a potted tree that can be replanted after the holidays.
- If giving physical gifts, opt for items that are long-lasting, useful, and sustainably sourced. Support local artisans or shop secondhand for unique and eco-friendly gifts.
- When wrapping gifts, get creative with cloth wraps, scarves, or old newspapers that can be reused or recycled.
- For the holiday feast, plan your meals to reduce food waste. Use leftovers efficiently and compost food scraps. Consider using reusable tableware instead of disposable items.
I hope this guide has given you some ideas for your low-waste, natural holiday decorating this year… And I hope you have some fun making these!
To get more natural, non-toxic lifestyle tips, recommendations, and more, sign up for our weekly newsletter.
The Filtery has been an independently owned & run small business from the very beginning—and we’d like to keep it that way! If you want to back accessible, human-created, and well-researched content on reducing toxins in your home, consider supporting us!
Thanks for reading. Let me know in the comments below if you have any other ideas or any favorite DIY holiday hacks!