Skincare and low-tox living has been a difficult journey for me. As someone with lots of sensitivities, AND is on a budget, I’ve struggled to find quality products that work, last, and don’t come with a luxurious price tag.
Finding reliable products turned into a frustrating odyssey, so I ended up overly simplifying my skincare routine—which isn’t necessarily what I wanted. Since I couldn’t find the right alternatives for me, I stopped using toner, face masks, and serums. The products that were available to me were either too expensive or had ‘no-no’ ingredients.
The solution? I found a couple of products that I liked, and I stuck with those. A simple bar soap as a cleanser, a scrub for exfoliating, and a moisturizer. Although this has worked for me, I do feel like my skin could use more support at times—especially around certain times in my cycle.
Exploring a new skincare routine has been on the back burner for a while, as I prioritized ‘detoxing’ other areas of my life. But, as I’ve gotten a lot more experience with DIY, I’m excited to explore some recipes and see if there’s anything worthwhile.
(P.S. If you want to learn more about toxic ingredients in skincare, we have a full guide for you!)
For this article, I tried several easy DIY recipes to make a full, more complete skincare routine—from cleansers to toners to serums. I chose simple and popular recipes to start. (We can always build from there!)
If you’ve been wanting to dive deeper into DIY skincare, this is the perfect place to start.
Here are the 8 recipes I tried:
- 8 Simple Homemade Skincare Recipes (Tried + Tested)
- 1. Green Tea & Honey Toner
- 2. Rose & Witch Hazel Toner
- 3. Honey Face Cleanser
- 4. Sugar Face Scrub
- 5. Rosehip & Jojoba Serum
- 6. Aloe & Green Tea Face Sheet Mask
- 7. Oatmeal + Honey Facemask
- 8. Herbal Hydrating Hair Spray
- 🍋 Join Thousands of Subscribers Reducing Toxic Chemicals
8 Simple Homemade Skincare Recipes (Tried + Tested)
Since I’m trying to create a full homemade skincare routine, I’m going to cover most basics with accessible, easy recipes. These are the ones I tried:
- Green Tea & ACV Toner
- Rose & Witch Hazel Toner
- Honey Cleanser
- Sugar + Orange Scrub
- Rosehip Oil Serum
- Aloe + Green Tea Facesheet Mask
- Oatmeal + Honey Facemask
- Rosemary Hair Hydrosol (bonus!)
I made each easy homemade skincare recipe from scratch, used them for a few weeks, and reviewed how each has felt on my skin—along with what worked and what didn’t. Let’s dive in!
1. Green Tea & Honey Toner
Rating: 3/5
Craft time: 30 minutes
Ingredients
- ¾ of a cup of freshly brewed green tea
- 1 tablespoon of honey
- ¼ of a cup of Apple Cider Vinegar
- ¼ teaspoon of Vitamin E (optional)
- 10 drops of essential oils of your choice (optional)
Directions
- Brew a strong cup of green tea and let it cool. I used two tea bags in one cup of water.
- Once the tea has cooled, mix the ACV, the green tea, the honey, and the vitamin E in a bowl and whisk making sure the honey dissolves.
- Add the essential oils of your choice and, using a funnel, add the mixture into a container.
My thoughts on this recipe:
I used this twice a day, in the mornings and nights, and at first I loved it. I haven’t used a toner in years and I wasn’t sure if I was going to like it, but I did. My skin feels sort of tight in a great way after using it. It was the perfect combo of toning and firming, without being too harsh or drying. I weirdly love the smell too!
BUT, there was a big problem with this one: I couldn’t go through it fast enough, and without a preservative, it started going bad…
As much as I loved the way it felt on my skin, after about 2 weeks, the toner developed a white fungi-looking film. It didn’t smell bad so I filtered the film out to see if it would grow again and it did, so it was indeed some type of mold/fungi. I had gone through about half of what I had made when it went bad, so I didn’t love the waste part of it.
A solution could be to make half the amount and make sure to use it quickly. Putting it in the fridge would extend the shelf life too (I had it in my bathroom cabinet.)
Ultimately, I don’t want to accidentally spray moldy toner on my face, and since the film on this one developed kind of quickly, I’m opting not to use it for the longterm. If I do decide to make it again in the future, I’ll just make a small batch and keep it in the fridge!
2. Rose & Witch Hazel Toner
Rating: 4/5
Craft time: 5-10 minutes
Ingredients
- ½ Cup of Rosewater
- ½ Cup of Witch Hazel
- 10 drops of an essential oil of your choice
Directions
- Measure half a cup of rosewater and add it to a spray bottle or glass container.
- Measure the witch hazel and add it to the rosewater.
- Add the essential oil of your choosing (I used lavender), and shake it. (Always shake before using, as the oils will separate.)
My thoughts on this recipe:
I can’t help but compare this toner to the Green Tea Toner above, as I started using it immediately after cutting the other one out. This one is gentle and refreshing, but it doesn’t feel as toning or firming as the other one.
This feels more like a hydrating spray than a toner. And I really do feel like my skin is feeling more moisturized and plump since I started using it. I find myself spraying it on at random times during the day and it just feels good. The rosewater also gives it a mild scent that’s uplifting and soothing.
In terms of durability, this one is much more shelf-stable. It has been on my cabinet for weeks now, and holding up perfectly. This is important for me because if I’m being realistic, I know that I won’t have the time to be crafting toner every week.
I didn’t give it the full 5 stars because it’s missing some of the qualities I look for in toner, like skin firmness, but it’s good enough that I’ll continue using it for now and maybe I can improve the recipe in the future!
3. Honey Face Cleanser
Rating: 5/5
Craft time: 10 minutes
Ingredients
- ¼ of a cup of honey
- ¼ of a cup of unscented Castile soap
- 3 tablespoons of distilled water
- 2 tablespoons of sweet almond oil
- 1 tablespoon of vegetable glycerin
- Essential oils of your choice
Directions
- In a bowl, mix the honey, Castile soap, water, sweet almond oil, and glycerin.
- Using a whisk or spoon, mix all the ingredients together until they’re fully blended. You especially want to make sure the honey dissolves. Be careful not to mix with too much force, as it will create a lot of foam—it’s soap after all!
- Add the essential oils of your choice and transfer the mix into a bottle.
My thoughts on this recipe:
I was a bit skeptical about this one. I’ve used Castille soap as a face cleanser before and found it to be too drying, so I wasn’t sure this was going to work. But since there was more to it than just soap, I figured it was worth the try.
I’ve been using it for 4+ weeks now and I’m surprised at how gentle it actually is. The honey leaves my skin feeling so soft and nourished. And the cleanser in general has a nourishing feel to it.
Since it lathers so well, you only need a tiny bit to get your whole face. It’s actually best to use a small amount since it can feel a bit drying when you use too much (I noticed that one day when I accidentally double-pumped).
This cleanser has also lasted for so long. I’ve been using it daily for over a month and it’s not only holding up really well, I still have about half left. Hopefully, it will keep until I’m done with it.
Plus, you can use it as a body soap too!
I’m going to stick to this recipe, and maybe even do some tweaking down the road to build upon it.
4. Sugar Face Scrub
Rating: 3/5
Craft time: 5-10 minutes
- ¼ cup of light brown sugar
- 3 tablespoons of sweet almond oil (or jojoba, olive, or rosehip oil)
- 1 tablespoon of orange peel powder (optional)
- Essential oils of your choice (optional)
Directions
- In a large bowl, add the sugar and the oil and mix very well.
- Add the orange peel powder and mix again until all the ingredients are integrated.
- Add your essential oils of choice, mix, and put the scrub in a container for storage.
My thoughts on this recipe:
I’ve been using this one twice or three times a week. To use it, I put a bit on my palm and add water. This is an important step! The first time I used it, I didn’t add water and it felt too rough on my skin. The texture wasn’t my favorite either, which was a bummer cause I loved the way my skin looked after.
However, the next time I used it, I added a bit of water to create sort of a paste before scrubbing my face and it made it SO much better. The texture improved and it didn’t feel so rough anymore… However, I’m still not fully satisfied with it.
The key ingredient here I think it’s the orange peel powder. I know I say it’s optional, cause it isn’t necessary, but it really boosts the recipe, and I highly recommend adding it. You can actually use the orange peel powder as a facemask too—just add water!
Overall, this scrub does its job not only at exfoliating but also softening and brightening.
Face scrubs are such an easy DIY product and although I love this one, I think the texture could still improve a little bit. Adding water helps but as you know, oil and water don’t mix, so it’s not fully what I hoped it would be.
5. Rosehip & Jojoba Serum
Rating: 5/5
Craft time: 5-10 minutes
Ingredients
- 2 tablespoons of Rosehip Oil
- 2 tablespoons of Jojoba Oil
- 1 teaspoon of Vitamin E
- 10 drops of essential oils
Directions
- In a bowl mix together the rosehip oil, and the jojoba oil.
- Add the vitamin E and incorporate.
- Finish up by adding your choice of essential oils, and mix.
My thoughts on this recipe:
This is easily my favorite recipe so far! I love the feel of this serum. It’s hydrating, absorbs so well into the skin, and feels nourishing and bright. I’ve been using it daily for over a month, and it’s definitely staying in my regimen.
I’m amazed at how easy, quick, and affordable making your own serum can be. And my skin is definitely grateful for this one. I’m noticing less redness and more brightness overall.
This is definitely staying as a permanent part of my skincare routine from now on. I’ve been using it before my moisturizer, and it works amazingly well. I’ve also used it throughout the day when I feel like my skin is looking a bit dull. So good!
If you’re thinking about trying any of these recipes, I recommend starting with this one!
6. Aloe & Green Tea Face Sheet Mask
For the face sheet:
I wanted to have a zero-waste option for this, so I used an old cotton t-shirt to create the actual sheet part. I simply cut a big square, put it on my face, and marked my eyes, nose, and mouth with a pen. Then I cut holes in the marking with some scissors. I put it in the wash after using and it came out perfectly clean and ready to be used again!
Rating: 3/5
Craft time: 15-20 minutes
Ingredients:
- 3 tablespoons of green tea
- 1 tablespoon of aloe
- 1 tablespoon of honey
Directions
- Brew a cup of green tea and set it aside to let it cool.
- In a bowl, add the honey and the cooled green tea and whisk together until the honey dissolves. Then, add the aloe.
- Grab your face sheet mask and dip it into the mixture, making sure it soaks very well.
- This step is optional, but I folded the mask, put it into a little bag, and tossed it in the freezer for 15 minutes. Doing this adds a cooling effect!
- Extend the mask over your face and let it sit for 15 minutes. Then remove and rinse off.
My thoughts on this recipe:
I have some mixed feelings about this one. On one hand, I loved the way my skin looked and felt after. It was incredibly soothing and brightening. The way aloe comforts the skin is amazing. And the cooling aspect also felt really good.
What I didn’t love (and this is true for a lot of face sheet masks, including the store-bought ones) is that it’s very drippy and uncomfortable to wear. The mixture was dripping down my neck and all over the floor which wasn’t the most relaxing. I could wring it out more, but then of course it wouldn’t have as much product on it and therefore might be less effective.
Overall, the recipe is good—it was just the comfort aspect that lowered the rating. If you don’t mind that, or maybe use a bit less mixture to soak your mask, you’ll love it!
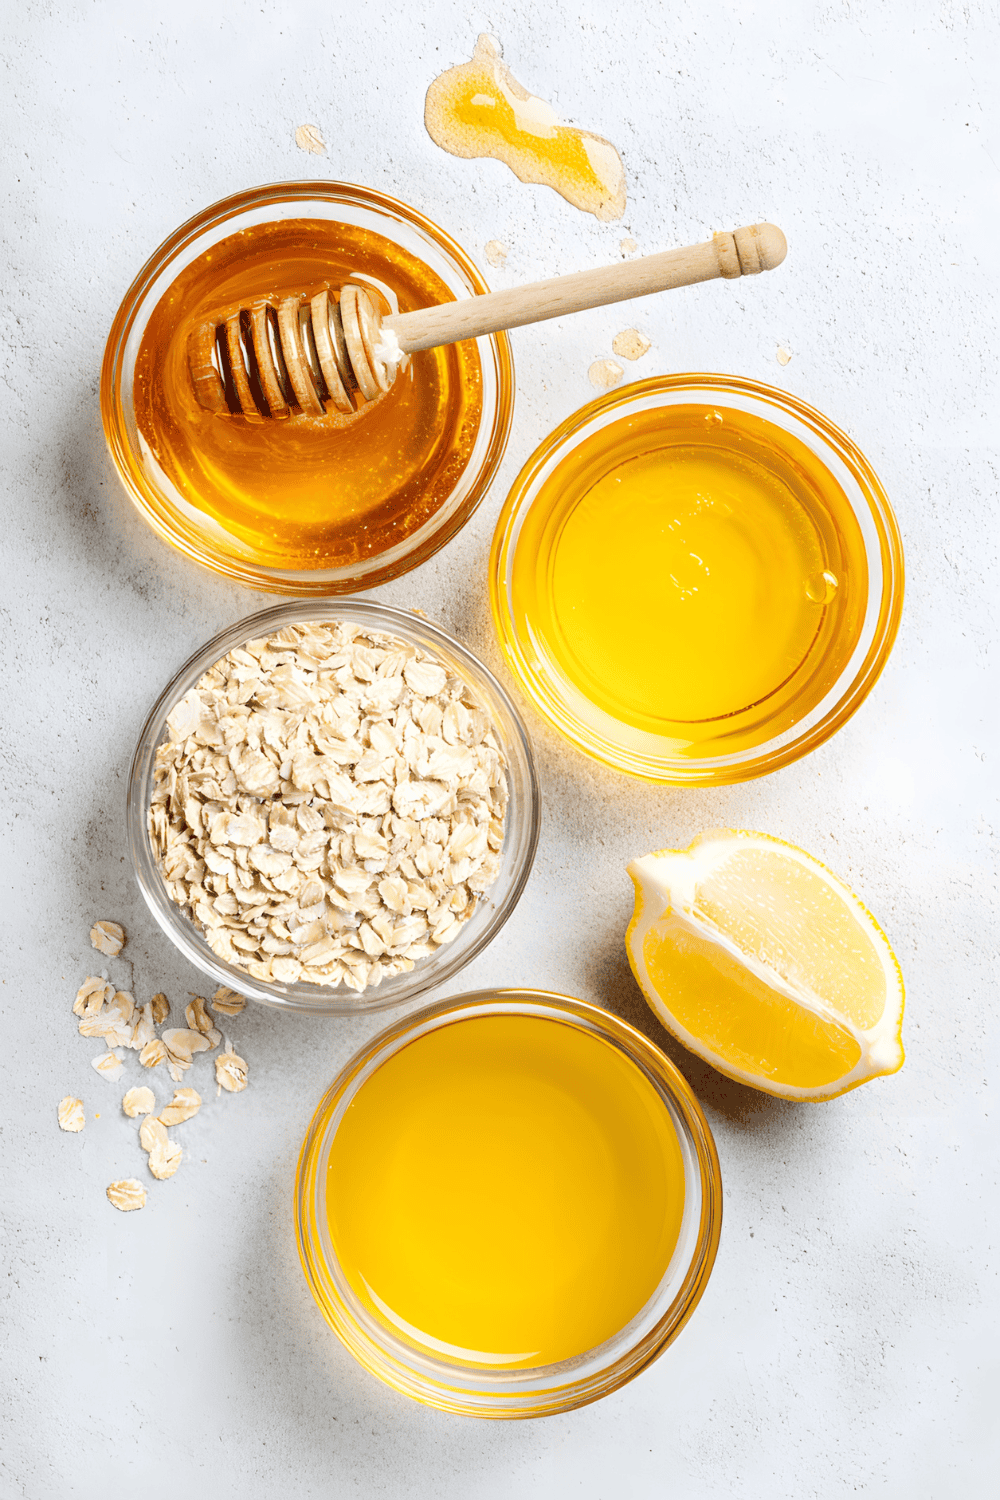
7. Oatmeal + Honey Facemask
Rating: 5/5
Craft time: 10-15 minutes
Ingredients
- 2 Tablespoons of Oatmeal
- 1 Tablespoon of Orange Peel Powder
- 4 Tablespoons of Water
- 1 Tablespoon of Honey
Directions
- Blend your oatmeal into powder and mix it with the orange peel powder in a small bowl.
- Add water and mix thoroughly until it’s well incorporated
- Add the honey and mix again
- Wait 5-10 minutes for the mixture to get a bit thicker. This makes it easier to apply to the face
My thoughts on this recipe:
Originally, I was planning on sharing two recipes for the face sheet mask, but I thought having an option without it could be more helpful. This recipe is so simple and perfect if you don’t feel like doing the extra face sheet mask work.
Plus, I wanted to give you another recipe that used the orange peel powder, so you have more to work with if you decide to buy it. I tried using the same ingredients throughout different recipes so you can get the most out of the ingredients you buy.
This recipe is truly amazing. Honey and oatmeal are super nourishing for the skin, and the orange peel powder gives your skin an extra glow.
To use it, I washed my face and applied it all over. Then I let it dry for about 15 minutes. Once it gets a bit hard (think of the texture of a clay mask when it dries!) remove it with warm water. So simple and so effective!
I’ve used many different recipes of oatmeal and honey recipes over the years but this one is really one of my favorites. First, the blended oatmeal makes it much easier to apply. I also feel like it covers the skin much better. The orange peel powder gives it the texture and feel of a mask and adds so many skin-boosting benefits.
I kept some orange peel powder and oatmeal already mixed together in a mason jar, so I could just pull it out and add water and honey—even easier than it already is! This recipe really makes it worth it to get the orange peel powder.
8. Herbal Hydrating Hair Spray
Rating: 5/5
Craft time: 1.5 – 2 hours
Ingredients
- 2 cups of dried or fresh rosemary
- 2 cups of dried or fresh lavender (chamomile works too)
- Distilled water
- Ice
Tools
- A large pot with a lid
- A container (ideally glass)
- Something to place the container on that’s heatproof (can be a ramekin, jar rack, or even a flat stone or silicone ring)
Directions
- (For fresh herbs only) Wash your herbs in cold water and remove the stems.
- In a large pot, add the ramekin or jar rack and place the heat-proof container on top.
- Add the herbs (either dry or fresh) all around your container and add enough water to cover them.
- Place the pot’s lid upside down, place the ice on the lid, and bring to a boil. You can add the ice to a bag to keep any water from falling into the pot.
- Once it’s boiling, turn the heat down to a gentle simmer and let it sit for 45-60 minutes or once the container is filled ¾ of the way. Keep an eye on the ice, adding more as it melts.
- Once your heatproof container is ¾ of the way full, let it cool and carefully remove from the pot.
- Transfer the infused water to a spray bottle and keep it in the fridge.
My thoughts on this recipe:
I’ve been using this for quite some time, and I wanted to share it here with you all because I love it.
I use very few products in my hair, and this is one that’s been on rotation for about 6 months. The first time I made it, I loved it so much that I have been using it since.
Although the process for this one might feel a bit more complicated, it’s worth it!
The main thing I notice is my hair feels more full and hydrated. I have a lot of hair, and it’s thick and long. The spray has helped me keep my hair bouncy, non-fizzy, and naturally shiny.
The spray works in dry or both hair. Most of the time I do a couple of spritzes right before leaving to give my hair some shine and a little scent. Highly recommended!
I hope these recipes have helped give you some ideas and inspiration for your own DIY skincare journey! If you decide to try any of them (or discover any tips for improving upon them!), let me know in the comments.
To get more natural & non-toxic lifestyle tips, product picks, and more delivered to your inbox once a week, sign up for our newsletter.
The Filtery has been an independently owned & run small business from the very beginning—and we’d like to keep it that way! If you want to back accessible, human-created, and well-researched content on reducing toxins in your home, consider supporting us!